Knead to Cook

Food & fitness obsessed girl.

  • Home
  • About me.
  • Recipes
    • Breakfast
    • Brunch
    • Snacks
    • Desserts
    • Vegan
    • Vegetarian
    • Gluten Free
    • Wheat Free
    • Evolution Power Yoga 40 Days
  • In the Media
  • Favorites.
  • Contact.

Chocolate Chip PB Cup Minis.

February 1, 2013 by Knead to Cook Filed Under: Cookies, Desserts, Valentine's Day 2 Comments

IMG_3238


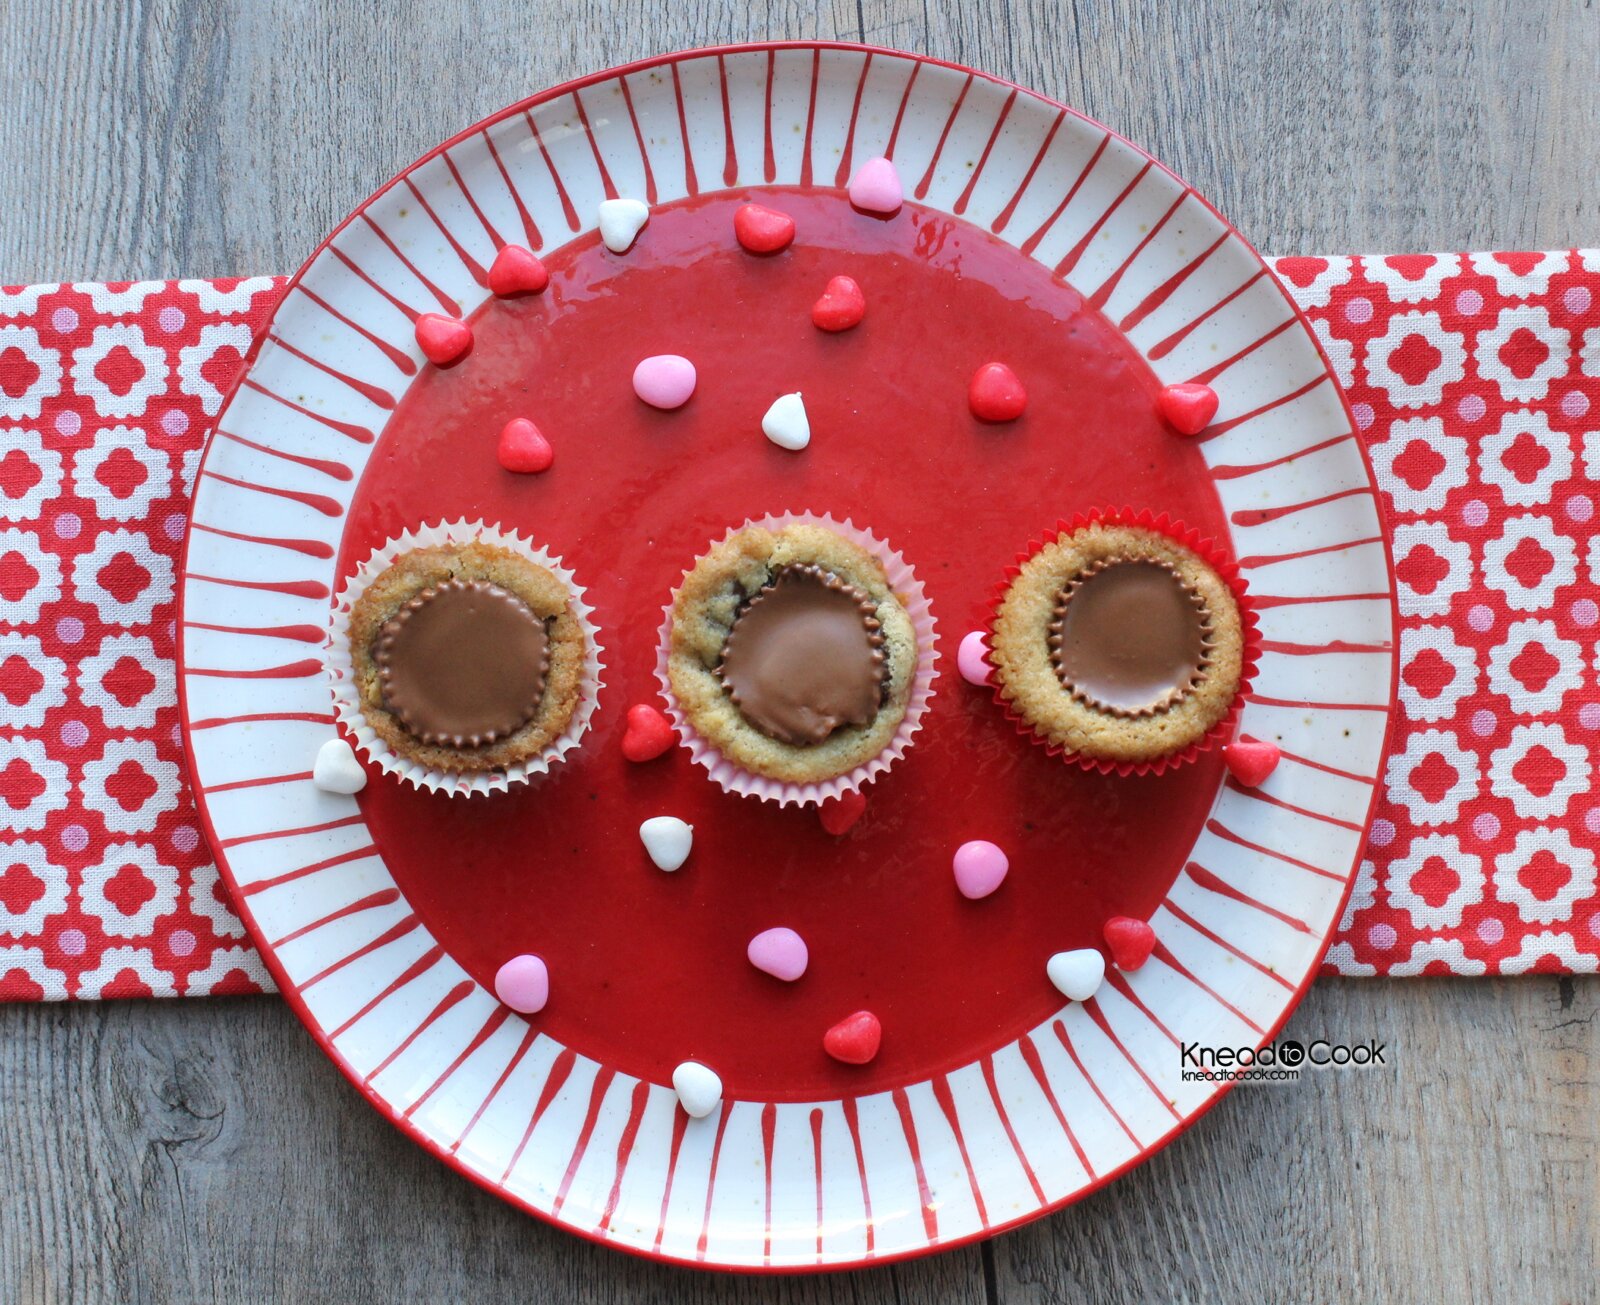
This is one of those OHHHHH mmmmm GEEE recipes.  It’s the perfect storm of chocolate, chocolate and oh wait, peanut butter!  I made these for our concession stand “contribution” for our swim meet tomorrow.  Standard protocol for sweets at a swim meet.  I think it should be dubbed “Junk food heaven” if you asked me. I digress, if you love chocolate chip cookies and Reese Peanut Butter cups – you will totally love these!  Would be fun for your Super Bowl party this weekend or a special treat for your Valentine too!

Ingredients:

1 bag of Reese’s Peanut Butter Cups (small but not the mini size) that are wrapped in foil – remove the foil and paper and set aside
1 cup + 2 tbl of all purpose flour (I used King Arthur’s)
1/2 teaspoon baking soda
1/2 teaspoon salt
1/2 cup of butter or butter substitute, at room temperature
5 tablespoons of sugar
5 tablespoons of light brown sugar
1 large egg, room temperature
1 teaspoon of vanilla extract
10 ounces of chocolate chips

Directions:

Preheat the oven to 375 degrees.  I used a mini muffin pan and lined with little paper cup liners.  In a small bowl or large measuring cup, combine the flour, soda and salt.  Set aside.

In your stand mixer, cream butter and sugars.  Then add the egg.  Blend.  Then add the vanilla extract.  Blend again.  In thirds, add the flour mixture.  Beat after each addition.  Avoid over mixing.  Add the chocolate chips and blend.  Then fill each muffin cup with about 3/4 of the dough.  Bake for 10-12 minutes or until slightly golden.  Remove and immediately place a peanut butter cup in the center, gently pushing down, until each cookie has a pb cup.  This recipe yielded 42 mini cookies for me.

This cookie recipe is adapted from Guittard Chocolate.  

— Knead to Cook

OXO Good Grips Cookie Press Butter Cookies

January 31, 2013 by Knead to Cook Filed Under: Cookies, Valentine's Day, Vegetarian 2 Comments

IMG_3234


OXO sent me some foodie swag this week and I have to tell you, I couldn’t wait to get my hands on it and use it in the kitchen.  I have a an older cookie press I believe from Williams Sonoma that isn’t that easy to use.  I’ve honestly always shied away from using it because of that fact, again, it’s old.  The OXO Good Grips Cookie Press tube for the cookie dough is huge!  That makes life so much easier!  It comes apart easily for cleaning.  The disks for shapes are so varied and awesome.  I’m in love… like I am with all of their products!  I went with a Valentine theme today in making over 100 cookies.  Yes, I’ll be sharing these with my friends!  I used the recipe for Butter Cookies that comes with the manual.  I made only two adaptations that I note below.  The retail value on the press is around $29 and they did send me their springtime shapes kit as well, which can be purchased separately.  Packaging was phenomenal.  The hard case that holds all of the shape disks is lovely.  Top notch!  Five star review. Here is the link if you’re interested.

http://www.oxo.com/p-1243-cookie-press-with-disk-storage-case.aspx


Ingredients:

1.5 cups of butter (3 sticks) – a lot of butter but I used Smart Balance baking sticks and this yields about 12 dozen or more cookies
1 cup of white sugar
1/2 teaspoon of salt
2 large eggs, room temperature
1 teaspoon vanilla extract
1 teaspoon almond extract
Hot pink food coloring (I used all natural food coloring that I found on line)
4 cups of all purpose flour (I used King Arthurs)

Directions:

Preheat the oven to 400 degrees.  Use ungreased, unlined baking sheets.

In your stand mixer, blend the butter, sugar and salt.  Beat until fluffy.  Add the vanilla, almond and the eggs (one at a time).  Gradually add one cup of the flour at a time.  Blend after each addition.  Add the food coloring (optional).  Then spoon the dough into your cookie press and go to town πŸ™‚  Add sprinkles (optional) before baking.  Press them down a bit so they stick.

I baked my cookies for 7 minutes and 30 seconds because I wanted them just done without any brown edging.  Those cookies will stay home for my family πŸ˜‰

Place on a cooling rack and then store in a tupperware container.

— Knead to Cook

Lemon Bars.

January 27, 2013 by Knead to Cook Filed Under: Cookies, Desserts, Valentine's Day, Vegetarian 4 Comments

IMG_3083

IMG_3005

{Will take better finished product/staged photos tomorrow – just got home from a fabulous party and daylight is gone.}

My husband is allergic to chocolate, cocoa specifically, and never really gets to eat dessert that I make for the family (not that he’s a big dessert fan).  Today, I wanted to make a recipe using my Magimix Food Processor that I’m also giving away tonight.  This recipe is a little thank you because he bought me a new car yesterday and I wanted to do something nice for him.  Plus my kids love lemons and I had a ton on hand so I thought I would give it a whirl.

Now I’ve never made lemon bars before.  I’m not sure exactly that I’ve ever even eaten one before.  So I went to my trusted source, foodnetwork.com and pulled a recipe.  I made it straight up like their’s and hope and pray it’s a hit with the family.

Ingredients

For the Crust:

  • Vegetable oil, for greasing
  • 1 1/2 sticks unsalted butter, diced
  • 2 cups all-purpose flour
  • 1/4 cup packed light brown sugar
  • 1/2 cup confectioner’s sugar, plus more for garnish
  • 1/4 teaspoon salt

For the Filling:

  • 4 large eggs, plus 2 egg yolks
  • 2 cups granulated sugar
  • 1/3 cup all-purpose flour, sifted
  • 1 teaspoon grated lemon zest
  • 1 cup fresh lemon juice (from about 8 lemons)

Directions

Make the crust: Position a rack in the middle of the oven and preheat to 350 degrees F. Grease a 9-by-13-inch pan with vegetable oil and line with foil, leaving a 2-inch overhang on all sides; grease the foil with oil. Pulse the butter, flour, both sugars and the salt in a food processor until the dough comes together, about 1 minute. Press evenly into the bottom and about 1/2 inch up the sides of the prepared pan, making sure there are no cracks. Bake until the crust is golden, about 25 minutes.

Meanwhile, make the filling: Whisk the whole eggs and yolks, sugar and flour in a bowl until smooth. Whisk in the lemon zest and juice. Remove the crust from the oven and reduce the temperature to 300 degrees F. Pour the filling over the warm crust and return to the oven. Bake until the filling is just set, 35-40 minutes.

Let the bars cool in the pan on a rack, then refrigerate until firm, at least 2 hours. Lift out of the pan using the foil and slice. Dust with confectioners’ sugar before serving.

Finished bar photos will be shared tonight.  I’m rushing off to a party this afternoon while these cool.  But wanted to share with you the process πŸ™‚

IMG_2973

IMG_2967

IMG_2976

IMG_2987

IMG_2978

IMG_2991

IMG_3001


— Knead to Cook

Sweet & Salty Valentine Cookie Bars.

January 21, 2013 by Knead to Cook Filed Under: Cookies, Desserts, Holiday Baking Ideas, Valentine's Day, Vegetarian 9 Comments

IMG_2701

406118_516739448348525_2131692520_n

Adapted from Guittard Super Cookie Chip Cookie Recipe.

Ingredients:

1 cup of all-purpose flour
1/2 teaspoon baking soda
1/2 teaspoon salt
1/2 cup of butter, softened
5 tablespoons granulated sugar
5 tablespoons of light brown sugar
1 egg
1 teaspoon vanilla extract
10 ounces of Guittard Super Cookie Chips
1/2 cup of pretzel pieces, salted
1/4 cup of M&Ms
Sprinkles (optional) Valentine Day oxoxo sprinkles used.

Directions:

Preheat oven to 375 degrees.

In a separate bowl, combine flour, soda and salt.  Spray the 9×9 glass pan with baking spray. Set aside.

In your stand mixer, paddle attached, cream butter and sugars.  Then beat in the egg and vanilla until creamy.  Add the flour mixture, blend.  Blend well.  By hand, stir in the chocolate chips.   Spread the dough into the pan evenly distributed.  Then press in pretzel pieces and the m&m’s throughout the top.  Bake for 20 minutes or so (until the edges are golden brown).  Let cool and then store in a container with a lid.


— Knead to Cook

Oat Chobani PB2 Cookies. {no flour & gluten free}

January 15, 2013 by Knead to Cook Filed Under: Cookies, Gluten Free, Snacks, Valentine's Day, Vegetarian 3 Comments


I had an old recipe that I wrote down on a notepad – totally random that I discovered it and I thought I would tweak it and mess around with the ingredients and see what would happened.  I made the batter two days ago and refrigerated it, only because the dough was really loose, and forgot about it.  Ha ha.  Life is just too busy lately.  So I remembered it today before I headed out to pick up my daughter and made the batch.

I haven’t been eating cookies or really anything “sweet” that I’ve been making because my weight is down 15-16ish lbs and I’m afraid eating something sweet will open the flood gates to the sweets again.  You know what I mean, right? So I reserved them for my dad and my girls to review.  Everyone LOVES them.  Hey, who would’ve thought. They look funky and a bit healthy but the reviews are glowing hence me sharing it with you.  Now bare with me on this recipe… You MUST be flexible.

IMG_2550


Ingredients:

1 stick of Smart Balance butter or regular butter, room temperature
1/4 cup of Chobani (vanilla)
1/4 cup of white sugar
3/4 cup of light brown sugar
2 tablespoons of PB2 powdered peanut butter
2 eggs
1 teaspoon of vanilla extract
1 teaspoon of baking soda
1 teaspoon salt
1.5 teaspoons of ground cinnamon
3 cups of old fashioned oats

Directions:

In your stand mixer, blend the butter, Chobani, PB2 and sugars together.  Don’t panic if it looks weird!  Then add the eggs and beat well.  Add the vanilla extract.  Then in a separate bowl, combine the dry ingredients and then add them to the wet mixture.  Blend together.  It will be ooey, gooey and a mess!  Scoop this mixture into a bowl and cover. Refrigerate for at least 2 hours or more (I let it go up to 2 days) so it can firm up.  Trust me, you need to this or they will be impossible to work with πŸ™‚

Then preheat the oven to 375 degrees.  On your cookie sheet line with parchment or a Silpat liner.  Scoop and place the dough about 1.5-2 inches apart.  Now the baking time will vary.  Normal cookies take 8-10 but I thought they were still too loose.  I baked them for about 14-16 minutes or until crispy and brown around the edges.  Trust me, I kept testing them and taking them out – inspection and then back in.  Your oven make take a bit longer so be patient.  This recipe makes a ton of cookies!  36 or so (small scoop sized).

— Knead to Cook

Raspberry Apricot Oat Bars.

January 8, 2013 by Knead to Cook Filed Under: Cookies, Snacks, Valentine's Day, Vegetarian 7 Comments

IMG_2184


IMG_2077 IMG_2167


I’ve been very lucky to receive several new cookbooks for birthday and Christmas gifts. I love the inspiration and trying out new recipes, after all, who doesn’t?!  I found this recipe in Giada’s latest cookbook and made it healthier and protein-packed thanks to my go-to Chobani yogurt.

These bars are cooling right now and they smell sooooooo good!

Ingredients:

Cooking spray
Parchment paper
13×9 glass or metal pan
13 ounce jar of jam (I used raspberry apricot but any will do)
8 dried apricots, chopped up
1 3/4 cups of all-purpose flour (I used King Arthur’s)
3/4 cup of brown sugar
1 teaspoon ground cinnamon
3/4 teaspoon salt
3/4 teaspoon baking soda
1 3/4 cup of rolled oats
1 cup of chopped walnuts
1 stick of butter or butter substitute, melted
1/4 cup + 1 tablespoon of vanilla Chobani
1 egg, room temperature
2 teaspoons of vanilla extract

Directions:

Place the rack in the center of your oven and preheat to 350.  Spray your pan with baking spray and then place a piece of parchment paper for lining the pan.  Spray the parchment paper as well.  Set aside.

In a small bowl, mix the preserve or jam and apricots.  Set aside.  In your stand mixer, whisk flour, sugar, cinnamon, salt and soda together.  Then add the oats and walnuts.  Then the butter, egg, Chobani and vanilla.  Blend into incorporated.  It will resemble a crust texture (little marbles).

Using a fork or small spatula, scoop out half of the mixture into your prepared pan and with clean hands or the fork, press it flat into the bottom of the pan.  Cover all of the areas with an even thickness of crust.  Then spread the jam mixture atop – not quite going to the ends.  Then crumble the remaining dough on top of the jam.  Bake for 35-40 minutes.  Let cool for at least 45 minutes.  Slice and serve.  Store in a tupperware container for up to 3-4 days, if it lasts that long.

— Knead to Cook

Cherry & Pistachio (red & green) Christmas Biscotti.

December 19, 2012 by Knead to Cook Filed Under: Cookies, Holiday, Holiday Baking Ideas, Vegetarian 1 Comment

IMG_1590

I make these red and green biscotti every Christmas.  I just love the red and green combination of the tart cherries and the green pistachios.  Biscotti are super easy to make, although take a bit of time because of the double baking.  But the end result is so worth it.

My grandmother always used cornmeal in her biscotti recipe and it just adds a different texture that makes these cookies undeniably a favorite.  I hope you get a chance to whip these up before Christmas next week.  The batch does make a fair amount, depending on how thick or thin you slice them.  And they keep for several days.  Perfect for dunking in tea, coffee or hot chocolate this season.

Ingredients:

2 cups of all purpose flour (I use King Arthur’s unbleached ap)
3/4 cup of stone ground corn meal
1.5 teaspoons of baking powder
1 teaspoon of salt
3 eggs, room temperature
1/2 cup of pistachios (shelled and roughly chopped) – you can use more or less
1/2 cup of dried tart cherries ( you can always use dried cranberries if you have them on hand)

Directions:

Preheat your oven to 325 degrees and line your baking pan with a Silpat or parchment paper.  Set aside.

In a dry mixture bowl combine, the flour, cornmeal, powder and salt together with a whisk.

In your stand mixer, blend your sugar and eggs together for 2-3 minutes or until fluffy.  Then add in the dry mixture.  Blend for 1 minute then add the nuts/cherries.  Blend until combined.  The dough will be sticky.  Wet your hands prior to removing the dough from the mixer, this will help you to work better with it.  Divide the dough in half.  Place both halves on your cookie sheet and shape into a 12 inch by 2.5 inch log.  Press the dough down to a thickness of about an inch or so.

Bake the dough for 32-34 minutes or until it starts getting a golden brown edge.  Remove and let cool for 10 minutes.  Then with a serrated knife, slice diagonal about 1/2-3/4 of an inch thick.  You don’t want it too thick or too thin so eyeball it.  Take each slice and lay it cut side down on your baking sheet.  They can be butted up against one another.  You can fit all of the slices on one cookie sheet using your space wisely.  Bake again for 20-24 minutes.  The cookies should be toasted and as they cool, will get a bit crunchier.  Store in a ziploc baggie or tupperware.  Great for sending in a care package or as a gift for friends and neighbors.

— Knead to Cook

Bacon Chocolate Chip Cookies topped with Sea Salt.

December 11, 2012 by Knead to Cook Filed Under: Cookies, Holiday, Holiday Baking Ideas, Vegetarian 24 Comments

This could be the quintessential PMS cookie.  Salt, sugar… it’s perfection.  Even if you don’t suffer with that lovely disorder… anyone who loves bacon will be grabbing for one of these.  I don’t know why I thought it would be a great combo but it totally is and the smell is soooooo fabulous.  I ate one and stepped away.  I have to restrain myself or go back out to run again.  πŸ™‚  Totally fun twist on a classic.

*Adaptation from Guittard.

Ingredients:

1 cup of all-purpose flour
1/2 teaspoon baking soda
1/2 teaspoon salt
1/2 cup of butter, softened
6 tablespoons granulated sugar
6 tablespoons of light brown sugar
1 egg
1 teaspoon vanilla extract
10 ounces of Guittard Super Cookie Chips or regular dark chocolate chips
4-6 strips of cooked, cooled and crumbled pieces of smoked bacon
Sea Salt

Directions:

Preheat oven to 375 degrees.

In a separate bowl, combine flour, soda and salt.  Set aside.

In your stand mixer, paddle attached, cream butter and sugars.  Then beat in the egg and vanilla until creamy.  Add the flour mixture, blend.  Blend well.  By hand, stir in the chocolate chips and bacon.  Drop rounded cookie dough onto your baking sheet.  Sprinkle a tiny bit of sea salt on top of each cookie dough ball.  Bake for 10 minutes or until lightly golden.  Let cool and then store in a container with a lid.

— Knead to Cook

Peppermint Patty Chocolate Chip Cookie Bars.

December 7, 2012 by Knead to Cook Filed Under: Cookies, Holiday, Holiday Baking Ideas, Vegetarian 8 Comments

Who doesn’t love peppermint?!  My kids LOVE it!  And tomorrow starts our first winter swim meet and I’m always baking like a madwoman to prepare.  The kids swim and they eat… this is what winter swim (and summer) is all about! Some healthy snacks and some decedent ones for post race celebration.  These are a reason to celebrate!  I promise.

Ingredients:

1 cup + 2 tablespoons of King Arthur’s all-purpose flour
1/2 teaspoon baking soda
1 teaspoon salt
1/2 cup of Smart Balance butter (or you can use regular butter)
6 tablespoons of packed brown sugar
6 tablespoons of granulated sugar
1 egg
1 teaspoon of peppermint extract
10 ounces of chocolate chips
1 bag of individually wrapped Peppermint Patties (unwrapped)

Directions:

Preheat the oven to 375 degrees.  Spray your 9×9 glass pan with baking spray.

In a small bowl, mix flour, soda and salt.

In your stand mixer, beat butter and both sugars for 3 minutes.  Then add the egg and peppermint extract.  Add the flour mixture and beat on slow until incorporated.  Beat in the chocolate chips by hand.

Take half of the dough and place it in the prepared pan and smooth it out to cover the bottom.  Then lay the peppermint patties over top of the cookie dough.  You can spread them or butt them together.  Then take the remaining dough and place it on top.  It may not cover totally but it will melt and distribute.  Bake for 22-24 minutes.  Keep a watchful eye if they need to bake a few minutes longer depending on your oven.

*Chocolate chip cookie recipe is an adaptation from Guittard’s super cookie chip cookie recipe.

— Knead to Cook

Double Chocolate Peppermint Biscotti.

November 26, 2012 by Knead to Cook Filed Under: Cookies, Holiday, Holiday Baking Ideas, Vegetarian 5 Comments


From the minute Thanksgiving is over I’m dreamily going through my days anticipating Christmas.  I know, most people are stressing, but I love this time of year.  Coincidentally, my birthday is very close, which only makes this time of year more fun for me!  I’ve been wanting to whip up my double chocolate peppermint biscotti and with a quiet house this afternoon, on this nutty cyber Monday, I took the opportunity.  They are as good as I remember from last year.  Nice hint of cool, crisp mint flavor, decadent smooth dark chocolate… ****I’m swooning.**

I love these as a little gift for neighbors, teachers or anyone who you want to share a lovely treat during the holidays with.  They package beautifully and ship perfectly.

Ingredients:

2 cups of all-purpose flour (I use King Arthur’s)
1/2 cup of unsweetened cocoa powder (I use Wilbur)
1 teaspoon baking soda
1 teaspoon salt
6 tablespoons of butter (I use Smart Balance baking stick)
3/4 cup of granulated sugar
2 eggs
1 teaspoon peppermint extract
1/2-3/4 cup of dark chocolate chips for the biscotti

Topping:

20 candy canes (crushed)
1 cup of melted chocolate (dark)
1/2 teaspoon peppermint extract
1/2 teaspoon canola oil

Directions:

Preheat the oven to 350 degrees.  Line your baking sheet with a Silpat or parchment paper.

In a large mixing bowl combine the flour, cocoa, soda and salt.  Whisk to combine.  In your stand mixer, paddle attachment on, blend the sugar and butter for 2-3 minutes.  Then add the eggs.  Blend.  And finally the extract.  Add the dry ingredients to the wet and blend.  This is a very firm dough.  Once combined, add the chocolate chips and mix by hand or with the mixer.

Separate the dough into two equal halves.  Then form a long log like shape that you flatten a bit.  It should measure about 12 or so inches long.  I like to make these smaller biscotti because they are very decadent with the chocolate coating.  Then repeat.  Place both logs onto your baking sheet and bake for 34-36 minutes or until firm.  Remove and let cool for 10 minutes.  Then place on a cutting board and with a serrated knife, slice 1/2 thick pieces on a diagonal.  Place them back on the baking sheet and return to the oven for 12 minutes or until toasted nicely.

Melt your chocolate over a double boiler or in the microwave, keeping a watchful eye so it doesn’t burn.  Add the oil and mix until creamy and smooth.  Add the peppermint pieces to a bowl and set aside.  Once the biscotti are done toasting.  Dip one end of your cookie into the chocolate.  Let the excess drip off.  Then sprinkle some peppermint pieces over the melted chocolate.  Place on a drying rack to set up.  Once the chocolate has firmed up, store in a tupperware container with a lid for up to 4-5 days.  Enjoy!

— Knead to Cook

  • « Previous Page
  • 1
  • …
  • 8
  • 9
  • 10
  • 11
  • 12
  • Next Page »
twitter  pinterest  instagram  mail  rss
welcome
Get Post via Email

Recent Posts

  • Plant based meal prepping.
  • Super easy pickled red onions and jalapeΓ±os.
  • Avocado and Bean Salad. Vegan.
  • The super easy raw Asian salad. Vegan. Gluten free.
  • Banana Blueberry Muffins. Vegan. Gluten free.

Categories

  • 4th of July/Patriotic
  • 5 favorite things…
  • Air Fried
  • Appetizers
  • Asian inspired
  • Awards.
  • Beans
  • Beef
  • Best Vegan…
  • Beverages
  • Breads
  • Breakfast
  • Brownies
  • Brunch
  • Cabot Fit Team
  • Cakes
  • Candy
  • Cheese
  • Chicken
  • Chili
  • Condiments
  • Cookies
  • Crock Pot
  • Desserts
  • Dips
  • Dressings
  • Easter
  • Egg dishes
  • Evolution Power Yoga 40 Days
  • Featured
  • Fish
  • Fitness.
  • Friday Favorites Series
  • Frozen Pops
  • Fruit
  • Gift ideas
  • Giveaway!!!
  • Gluten Free
  • Going and Living Vegan
  • Grilling
  • Grilling/Rubs/Sauces
  • Ground Turkey
  • Halloween
  • Health & wellness
  • Holiday
  • Holiday Baking Ideas
  • Holiday Gift Guides
  • Homemade Chips
  • Ice cream
  • Indian-inspired.
  • Italian-inspired
  • Knead to Cook Promotions
  • Lentils
  • Life.
  • Lucy Let's Go Post
  • Mexican
  • Muffins
  • My story.
  • No bake/cooking required!
  • Notable mentions.
  • Nuts
  • Pantry
  • Party Foods
  • Pasta
  • Pies
  • Pizza
  • Popcorn
  • Pork
  • Potatoes
  • Pressure Cooker
  • Product Review.
  • Quick Bread
  • Raw
  • Rubs
  • Running/Races
  • Salads
  • Salsas & Guacamole
  • Sauces
  • Seafood
  • Side dish
  • Smoothies
  • Snacks
  • Soups
  • Sponsored
  • St. Patrick's Day
  • Stews
  • Stocks/Broths
  • Thanksgiving
  • Tofu
  • Travel & eating
  • Turkey
  • Valentine's Day
  • Vegan
  • Vegan Burgers
  • Vegan proteins
  • Vegetarian
  • Vinaigrette
  • Vitamix
  • Wheat Free
  • Yogurt
  • Your Life Edit Foundations
  • Zoku Popsicles
my foodgawker gallery
my photos on tastespotting
BEST Food Blogger Recipes
POPSUGAR Select Food POPSUGAR Select PLUS
Foodista Food Blog of the Day Badge
my healthy aperture gallery
My Menu On Honest Cooking
Sorry:

- Instagram feed not found.
iGourmet.com

<a href=”http://www.pntrac.com/t/SEFHRkZMR0xBTURISkdBTUlNREc”><img src=”http://www.pntrac.com/b/SEFHRkZMR0xBTURISkdBTUlNREc” border=”0″ width=”199″ height=”547″ title=”Caudalie Exclusive Premier Cru GWP” alt=”Caudalie Exclusive Premier Cru GWP”></a>

Quick Links

  • Home
  • About me.
  • Recipes
    • Breakfast
    • Brunch
    • Snacks
    • Desserts
    • Vegan
    • Vegetarian
    • Gluten Free
    • Wheat Free
    • Evolution Power Yoga 40 Days
  • In the Media
  • Favorites.
  • Contact.

Archives

  • August 2019
  • July 2019
  • June 2019
  • May 2019
  • April 2019
  • March 2019
  • February 2019
  • January 2019
  • December 2018
  • November 2018
  • October 2018
  • September 2018
  • August 2018
  • July 2018
  • June 2018
  • May 2018
  • April 2018
  • March 2018
  • February 2018
  • January 2018
  • December 2017
  • November 2017
  • October 2017
  • September 2017
  • August 2017
  • July 2017
  • June 2017
  • May 2017
  • April 2017
  • March 2017
  • February 2017
  • January 2017
  • December 2016
  • November 2016
  • October 2016
  • September 2016
  • August 2016
  • July 2016
  • June 2016
  • May 2016
  • April 2016
  • March 2016
  • February 2016
  • January 2016
  • December 2015
  • November 2015
  • October 2015
  • September 2015
  • August 2015
  • July 2015
  • June 2015
  • May 2015
  • April 2015
  • March 2015
  • February 2015
  • January 2015
  • December 2014
  • November 2014
  • October 2014
  • September 2014
  • August 2014
  • July 2014
  • June 2014
  • May 2014
  • April 2014
  • March 2014
  • February 2014
  • January 2014
  • December 2013
  • November 2013
  • October 2013
  • September 2013
  • August 2013
  • July 2013
  • June 2013
  • May 2013
  • April 2013
  • March 2013
  • February 2013
  • January 2013
  • December 2012
  • November 2012
  • October 2012
  • September 2012
  • August 2012
  • July 2012
  • June 2012
  • May 2012
  • April 2012
  • March 2012
  • February 2012
  • January 2012
  • December 2011

Copyright © 2019 · Swank WordPress Theme By, PDCD