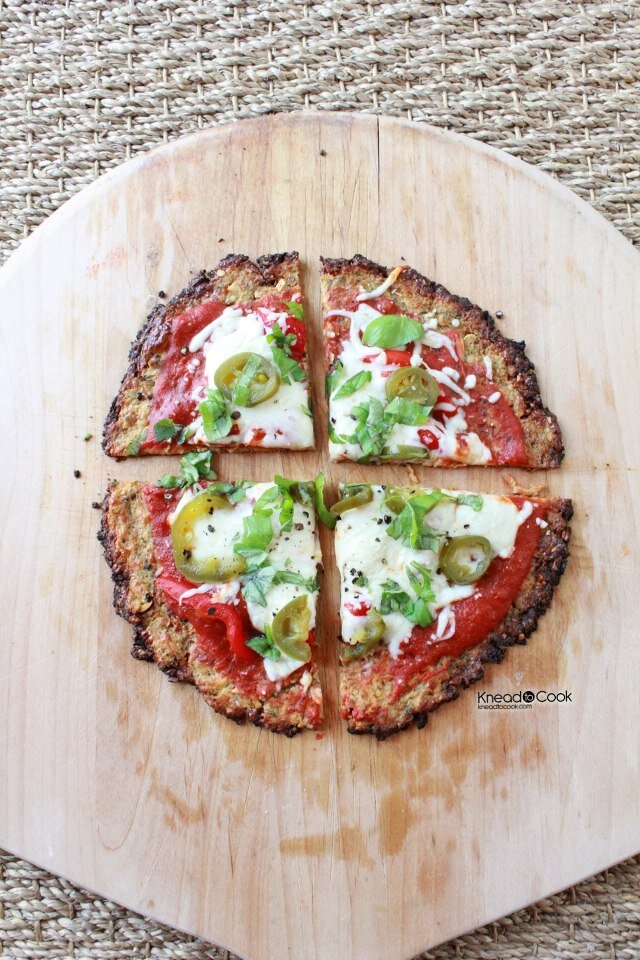
After numerous attempts, I’m thrilled that today I finally got it! Any recipe takes time to develop… this one was no exception! If you follow my simple steps, I promise you will have success too! This is grain-free, vegetarian and gluten-free. Packed with flavor and you control the toppings you want on top. I baked these up earlier in the day (even the day prior) and use them when I need them.
Ingredients:
1 medium-sized head of cauliflower (I used organic), washed and cut into smaller florets (remove the stems)
3 cloves of garlic, minced
1/4 teaspoon of sea salt
1 teaspoon of dried basil
1/2 teaspoon of dried parsley
1/2 teaspoon of crushed red pepper
1/2 cup of part skim mozzarella cheese (grated)
1/4 cup of grated asiago cheese (measure it grated, light and fluffy not packed down)
1 egg
Salt and pepper
Directions:
Preheat your oven to 450 degrees with your pizza stone on the lowest rack setting.
1. Make sure you’re starting with washed cauliflower that has been dried as much as possible.
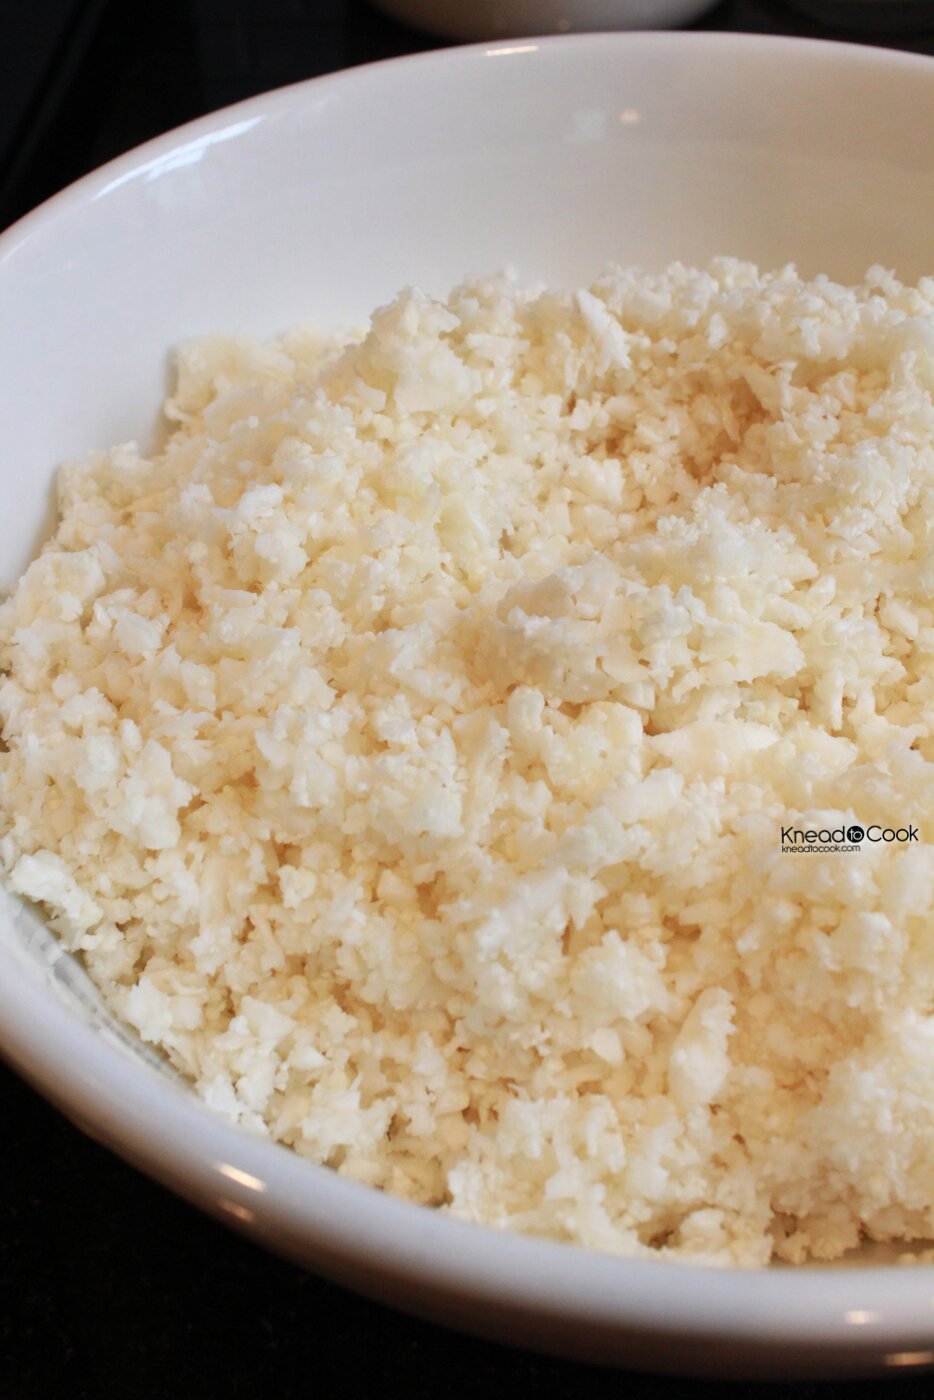
2. Take your florets (with most of the stems removed) and place in your food processor or Vitamix. Pulse about 8-10 times until it looks like fluffy snow (see pic). I worked in batches so not to overcrowd.
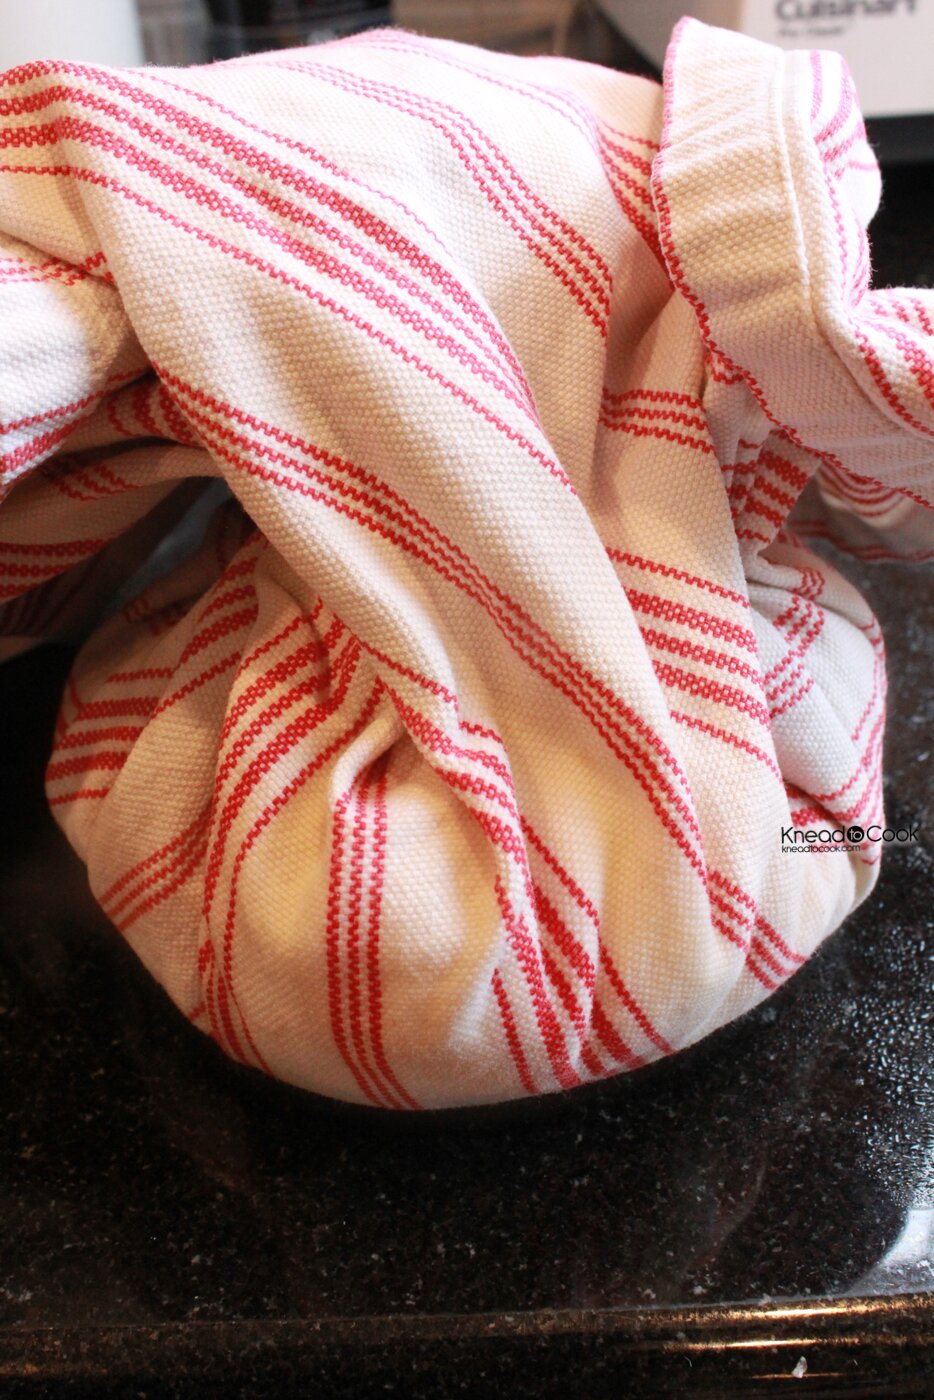
3. Add the cauliflower “snow” to a microwave safe bowl and cover with plastic wrap. Cook in your microwave for 3 1/2 minutes. Remove carefully and let it rest, covered for 1 minute. Remove the plastic wrap and dump the cauliflower into the center of a clean dishtowel. Let this cool for about 8-10 minutes.
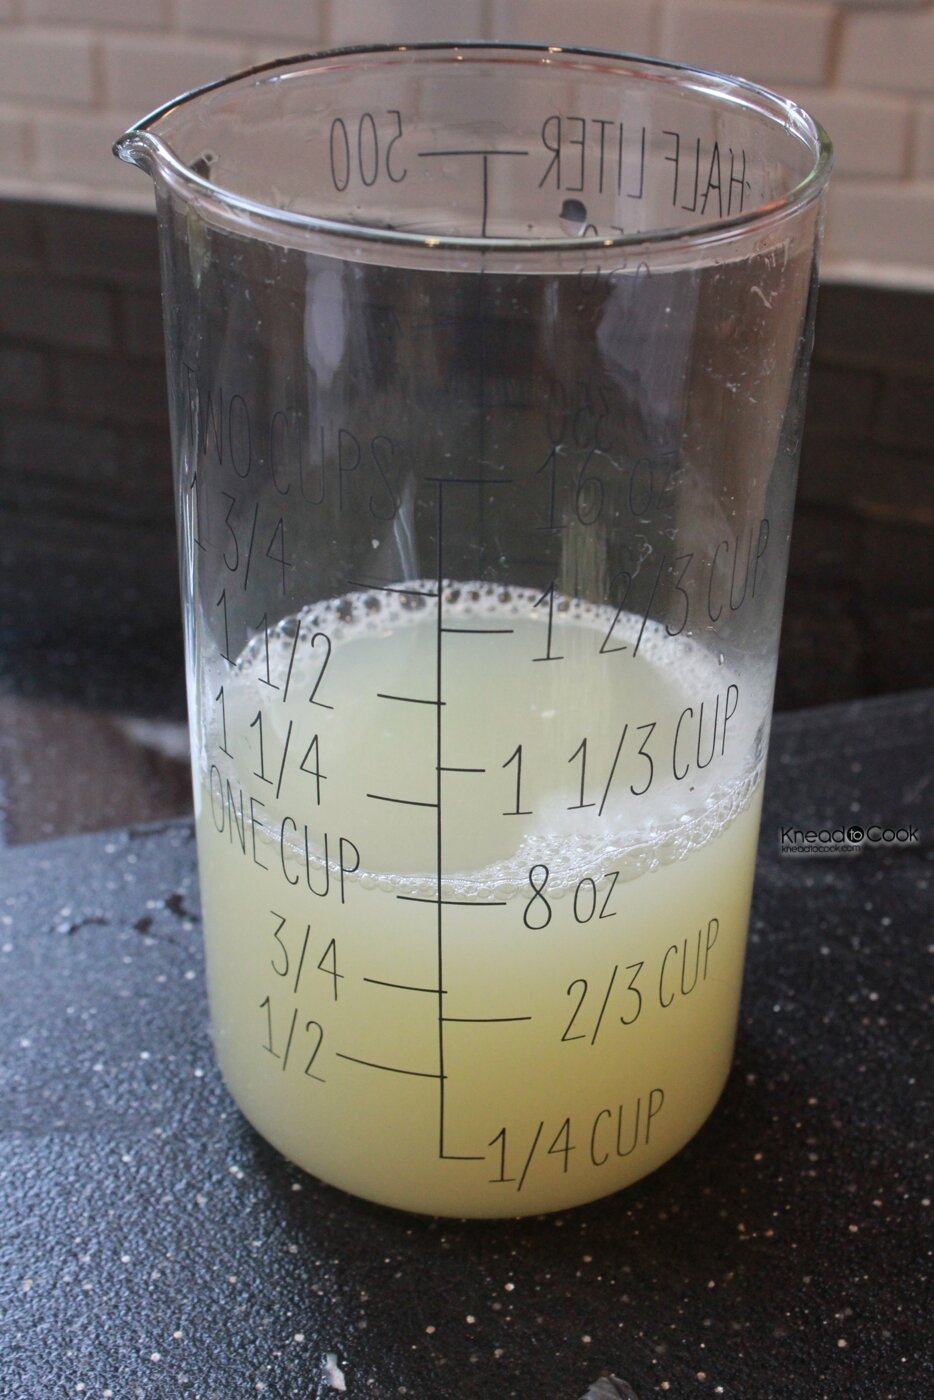
4. Once cool, place a large bowl underneath and twist up the towel (see pic) and ring it out. When I say ring, I mean it! Keep ringing until you literally get no water out of the cauliflower anymore. See the pic of how much water I got from one medium sized head of cauliflower (over 1 cup)! Insane! You need to do this to make the crust perfect… trust me.
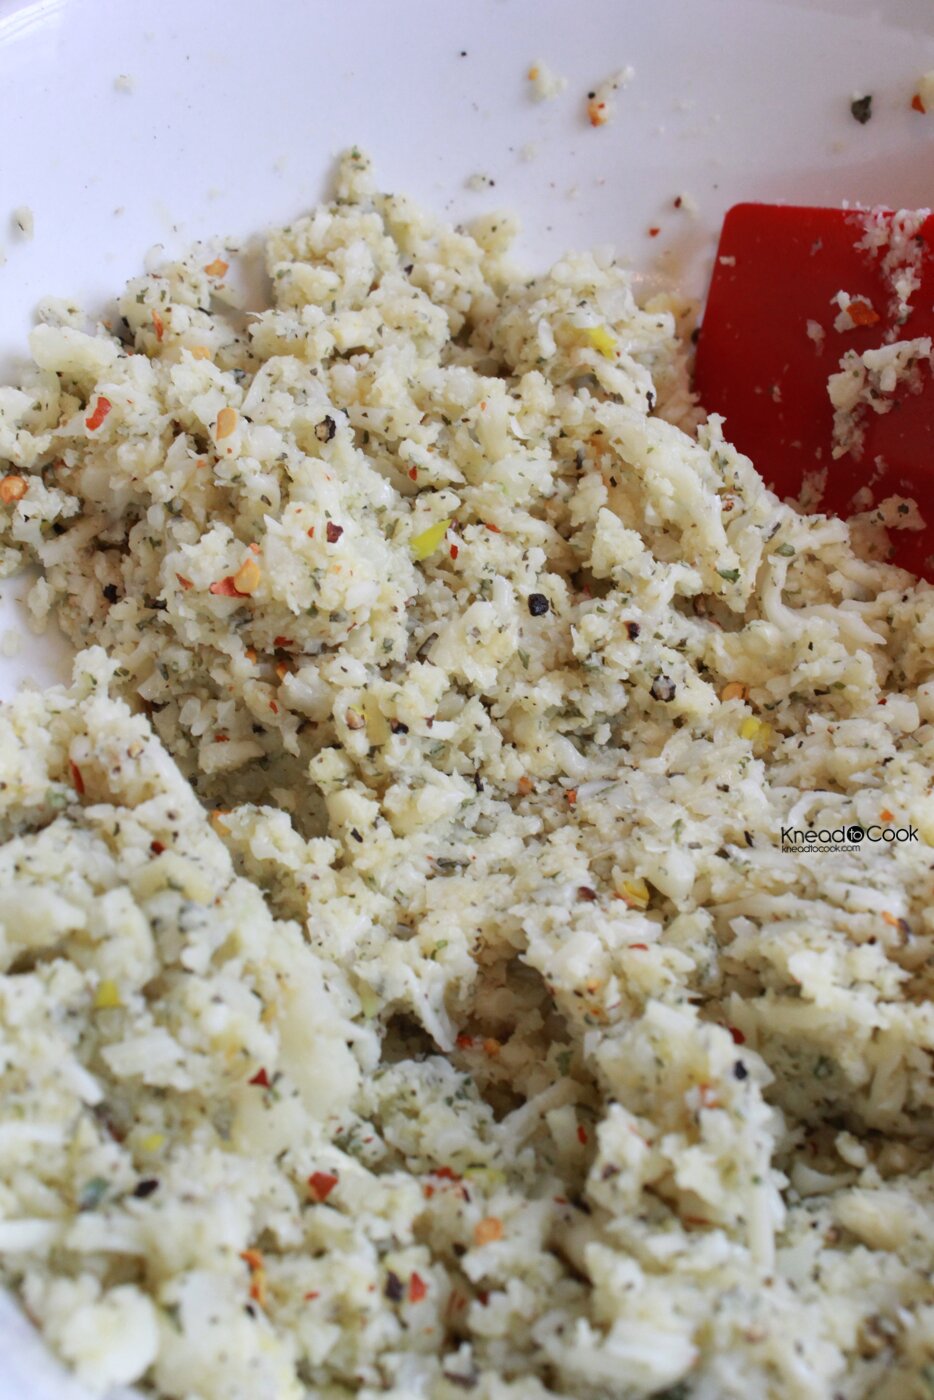
5. Open the towel to reveal what looks like sugar cookie dough (best description). See pic. Add this to a mixing bowl or stand mixer bowl and add the remaining seasonings/ingredients. Adjust here what you love or omit what you don’t. Mix well in your stand mixer or with your hands. The dough is very easy to work with and will be a bit sticky but not bad.

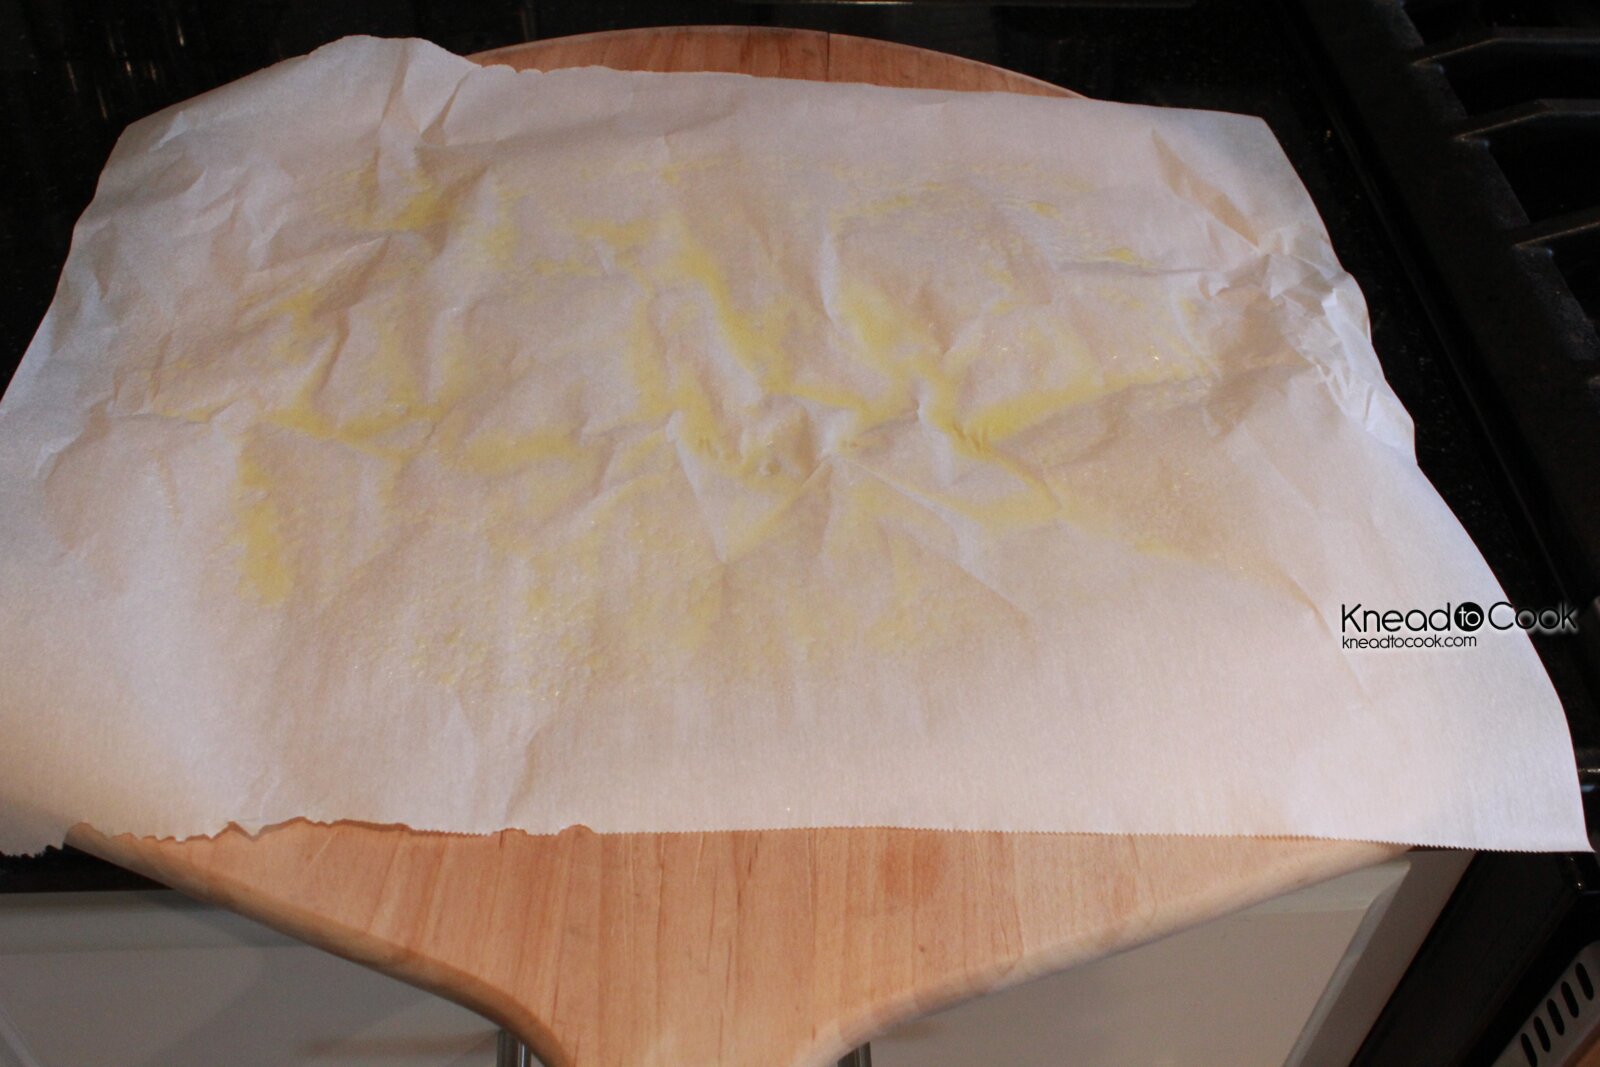
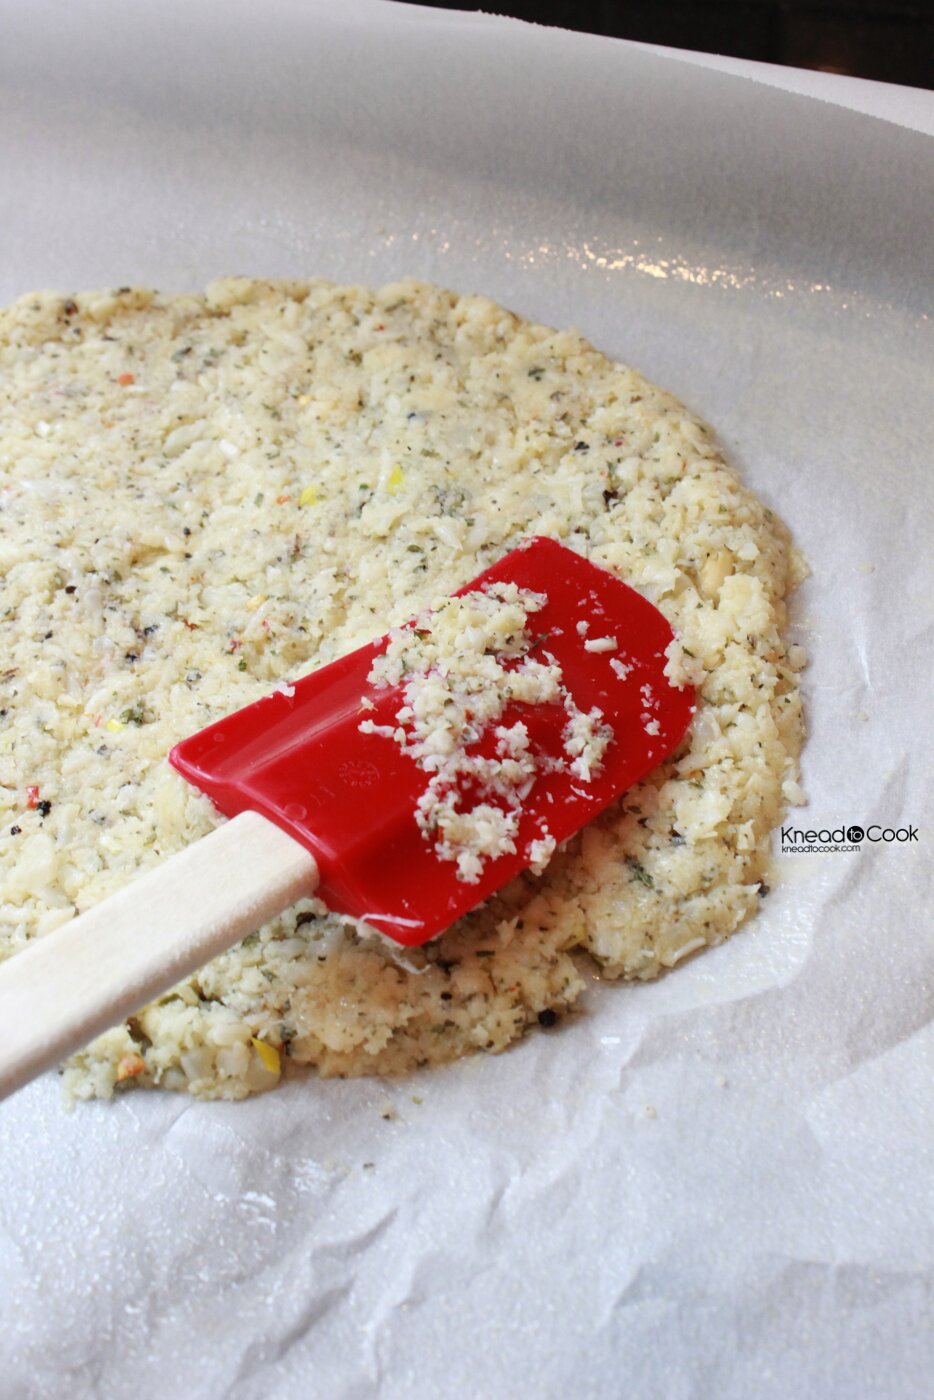
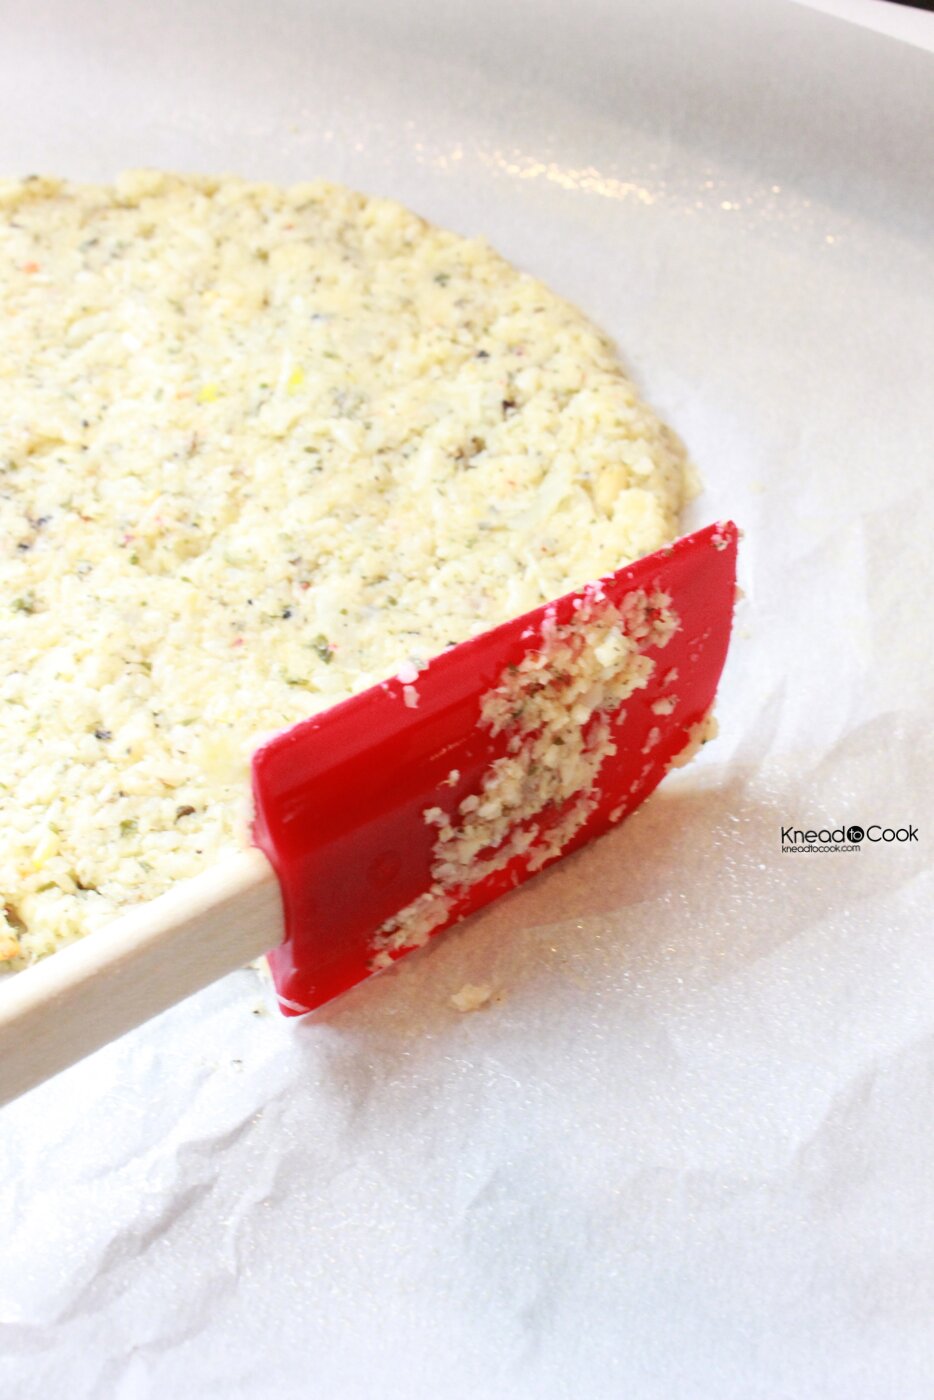
6. I made two 8 inch crusts. Take a large enough piece of parchment paper and spray it with a non stick oil (I used Smart Balance). Then split your “dough” in half and form it into an 8 inch round or whatever size you desire. I used a rubber spatula to press the dough down and tighten up the edges. It worked perfectly! (see pic) You want to make sure that the dough is less than 1/2 an inch thick and even throughout. I started at the center and worked my way out. I then made sure the edges had no cracks and were pretty tight.
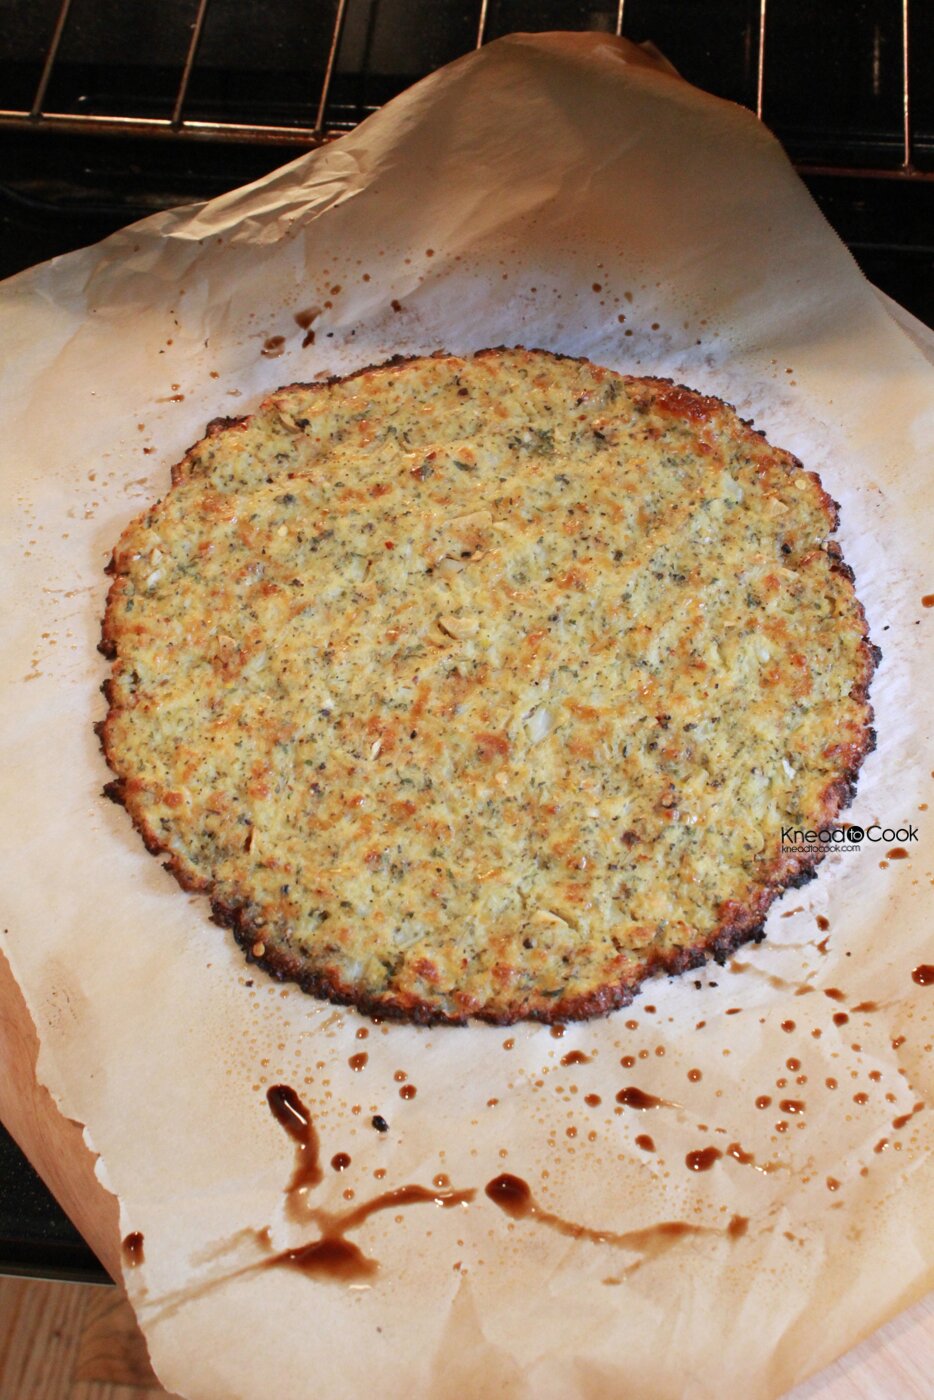
7. With a pizza peel, slide your parchment paper with dough onto your pizza stone in the preheated oven. Bake for 18-22 minutes or until golden. This will depend upon your oven. I like it more golden brown so that’s my recommendation. Then remove gently and let the crust cool.
8. I pre-made these for tonight. When you are ready to cook, make sure your oven has been pre-heated for at least one hour at 450 degrees with the stone inside. Top your crust with whatever you like and bake until cheese is melted or about 4 minutes.

Enjoy!
— Knead to Cook

This is awesome! I can’t wait to make it, thank you so much Robin!!
Thanks Monica!!! I hope you enjoy it as much as I have creating it 🙂
Made this tonight and it was amazing Robin! TY so much for this recipe!!
Can’t wait to try this, so unique!
I’m thinking I may make it tonight too! I love it 🙂
I made this tonight for dinner, we will definantly make it again. Thanks for the great recipie
Monica Mooney has been raving about your pizza’s I had to come over and drool, Robin can I make this without a pizza stone? I am going to try a baking sheet, prob not as great as yours. <3 Nettie
Nettie, You sure could! I would line your pan with parchment paper 🙂
I’m making this tonight Robin! I can’t wait to try it!! 🙂
So glad you did! Thank you for sharing 🙂 oxox
Do you think it would work without the egg? It would be perfect for a low protein diet for PKU.
You need a binder. What do you typically use in lieu of an egg?
What if I don’t have pizza stone?
Bake on a cookie sheet lined still with sprayed parchment.
When you place on pizza stone, do you leave parchment paper under the dough? So parchment paper is between dough and stone?
Yes I suggest it.
Can this be made without cheese and still work? I’m on a no grain/sugar/dairy regimen and this would feed my need for pizza!
I think so. I haven’t made it without but I would bump up the seasoning more (garlic and spices) to bump up the flavor.
Loved this crust! Was so good I ate it as breadsticks with marinara! I might have went a little heavy on the red pepper flakes, but it was perfect for me! I also got about 8 oz out of the squeezing process. This may have to be a weekly meal now.
Hey Amber that is FANTASTIC! I love hearing how you used this recipe. I must try that 🙂
How well would these freeze after the first baking? meaning, I do the pre-baking, let them cool and toss them into the freezer to make pizza at a later date? And do you think I would need to defrost before topping them and tossing them in the oven a second time?
I honestly haven’t frozen them but see no reason why you couldn’t. I would pre-bake and let cool completely. Wrap well. Lay flat in your freezer. Defrost (unwrapping) on your countertop. Then top and bake again.
hi! I made this for lunch today but I couldn’t get the base to set right. I was thinking it was maybe one of these two factors, or both:
1) I used “flax” egg to bind the mix together, maybe I used too little?
2)Maybe I didn’t ring the cauliflower enough??
I’d love to try this again! My brother and I still loved the taste of the pizza base.
The most important thing is to remove as much water from the cooked cauliflower as humanly possible. I have only used egg as the binder – that also could potentially be an issue. My best fix it tricks. It is yummy and I hope you try it again soon.
Cheers, Excellent stuff.
Made this today and it was a total flop. Ha! It tasted really good but it was all mush because it stuck to the paper and I had to peel it off. I used wax paper and sprayed it. Any thoughts on what went wrong? Thanks again for a great recipe. I know it was user error. 🙂
It took me many tries to nail this recipe (the one posted). The biggest thing was to completely remove the liquid from the cauliflower (this took several ringing out sessions). Once the edges got browned I removed promptly. Please try it again and work in batches – maybe that will help in making it easier.
I used flax instead of egg as well because I am vegan. It didn’t hold the crust together too well, next time I will use a different binder!
What other subs do you use for eggs other than flax?
This was GREAT!! Thank you so much for this recipe. Everyone loved it, and I loved making it! Can’t wait to share it with more GF friends!
YAY!!!!! I love hearing that 🙂 oxox
I just made this and it turned out perfect!!! Thank you so much!!!
Excellent! Glad you had success with it. oxo
So first I bake it and brown it for 18-22 minutes, cool. Then put toppings on and heat to melt cheese or warm toppings. Wow this is a great and seemingly simple recipe! I can’t wait to make this!!!
Yes, then top it with your favorite toppings and bake until the cheese melts and everything is hot 🙂
Hi! I am going to try this out this weekend. I have parmesan. Do you think that can be used in lieu of the asiago cheese? Or should I make a special trip to the store for that?
So excited to try this!
Try it!! I would think it would work 🙂 oxo
I made it just exactly like you said to, and it was wonderful. Thank you for all your hard work in perfecting it for the rest of us. Sincerely, Lori
Lori, Thank you for taking the time to write a review, I’m so thankful and blessed! Enjoy and bon appetit!
I’ve tried this recipe twice and squeezed ALL the water out and then some lol but its still not crispy any suggestions ? it is still delicious though even if i have to eat it with a fork .
You can cook it on the stove (with a little bit of olive oil in the pan first) to crisp it up. I’ve had success getting my stone very hot (preheat my oven for about an hour or more). Remember it won’t be super crispy like dough crust would be but it should be able to be picked up.
Can you just quickly steam the cauliflower instead of using a microwave? I am very weary of using microwaves esp. with plastic coverings.
-a
You can 🙂 Robin
Do I really need to preheat the oven and stone for 1 hr?
Yes, I highly recommend it. I have the best results really getting the stone and oven nice and hot versus when I don’t.
Superb, what a web site it is! This webpage provides useful facts to
us, keep it up.
My husband & I made this for Valentines Day! Every year for the last 8 years we have bought a heart shaped pizza from a local pizzeria and celebrated our Valentines Eve… This year we made this pizza from your recipe and turned the crust into a heart shape. I wish I could post a picture of it because it turned out amazing! We used turkey bacon, green peppers, green onions and tomatoes for the toppings, everything about this, turned out great & was absolutely delicious! thank you for this recipe!!
Erika your message made me so happy! Thank you for taking the time to share your lovely comments! Sounds like the perfect Valentine’s Day to me! oxo
Hope you enjoy it! Thanks for sharing.