
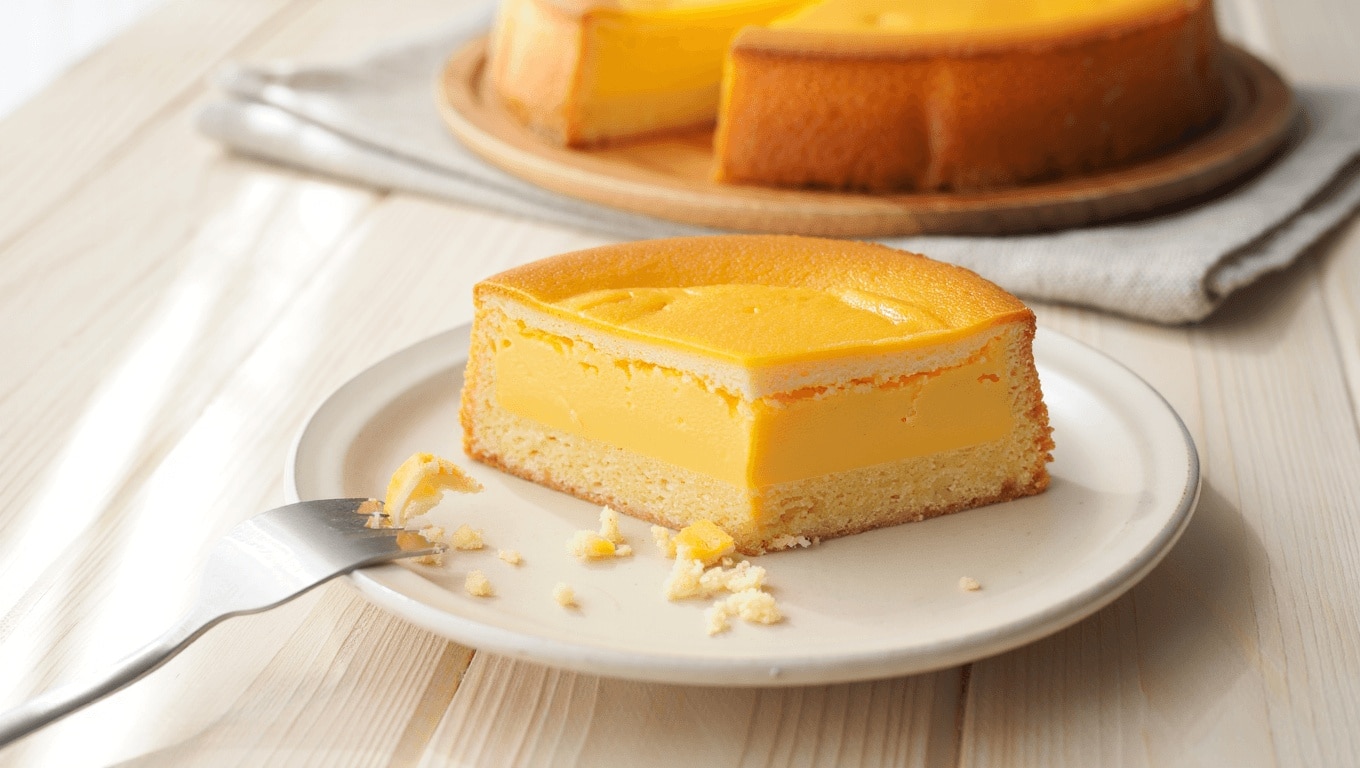
Light, creamy and almost mysterious, this Vanilla Magic Custard Cake turns a simple batter into three distinct layers while it bakes. The top becomes airy and golden, the middle soft and custard-like, and the base remains moist and slightly dense. Read on for a practical recipe, baking tips, and quick variations to help you master this show-stopping dessert.
Why this vanilla custard cake is special
This dessert earns its name because the batter separates during baking into three textures. You don’t need special equipment. A few basic pantry staples and a gentle hand produce a cake that looks impressive and tastes comforting.
- Three-layer texture: light top, creamy custard center, tender bottom.
- Minimal fuss: no complicated techniques or piping.
- Customizable: swap vanilla for chocolate, or add fruit for a twist.
Ingredients for a classic Vanilla Magic Custard Cake
These amounts make about 10 slices in an 8×8 inch pan. Use room-temperature eggs for best results.
- 1/2 cup unsalted butter, melted and slightly cooled (about 113 g)
- 2 cups milk, lukewarm (500 ml)
- 1 1/4 cups powdered sugar (150 g)
- 4 large eggs, separated
- 1 tablespoon water
- 1 cup all-purpose flour (115 g)
- 2 teaspoons vanilla extract
- Powdered sugar for dusting
Step-by-step baking method for consistent layers
Follow these steps to achieve the characteristic layered outcome. Move deliberately but don’t overwork the batter.
- Preheat oven to 325°F (163°C). Grease an 8×8 inch baking dish and set aside.
- Whip the egg whites until they hold stiff peaks. Set them aside in a clean bowl.
- Beat the egg yolks with powdered sugar until the mixture lightens in color.
- Add the melted butter and 1 tablespoon water. Mix briefly to combine.
- Fold in the flour just until incorporated; avoid overmixing.
- Slowly pour in the lukewarm milk and vanilla while mixing gently.
- Fold the whipped egg whites into the batter in three additions, keeping the volume.
- Pour the batter into the prepared pan and place in the oven.
- Bake for 40–60 minutes. Start checking at 40 minutes. The center should be slightly jiggly.
- Let the cake cool completely before dusting with powdered sugar and slicing.
Troubleshooting and pro tips for perfect results
- Egg whites: fold gently to preserve air that creates the top layer.
- Oven timing: every oven is different; check after 40 minutes.
- Too brown on top: tent with foil partway through baking.
- Jiggly center: that’s expected; it firms as it cools because of the custard layer.
- Pan size: use the specified 8×8 inch pan for similar layer proportions.
Easy variations and flavor ideas
Small swaps change the cake’s personality without extra work.
- Chocolate: replace 1/4 cup flour with unsweetened cocoa for a chocolate custard cake.
- Banana: fold mashed banana into the batter for a fruit-forward twist.
- Fruit-topped: add fresh cherries, berries, or a dusting of cinnamon for seasonal flair.
- Extracts: try almond or lemon extract in place of vanilla for a different aroma.
Quick facts: timing, yield, and nutrition at a glance
- Prep time: about 15 minutes.
- Cook time: 45 minutes average (40–60 minutes range).
- Total time: roughly 60 minutes including cooling.
- Yield: about 10 slices.
- Category: Dessert — baked custard-style cake.
- Cuisine: American-inspired simple dessert.
- Estimated nutrition per slice: ~224 kcal, 11.8 g fat, 25 g carbs, 4 g protein.
Serving suggestions and storage tips
- Serve slightly chilled or at room temperature to best enjoy the custard center.
- Dust with powdered sugar just before serving for a clean look.
- Store covered in the refrigerator up to 3 days to preserve texture.
- Freeze slices in an airtight container for up to 1 month. Thaw in the fridge.
Similar Posts:
- Chocolate magic custard cake: make a dreamy three-layer dessert in 30 minutes
- Strawberry custard cake: easy homemade recipe that melts in your mouth
- Lemon custard cake recipe: easy, creamy showstopper
- Orange custard cake: secret tips for a silky, zesty showstopper
- Banana magic cake made easy: one-bowl, no-fuss dessert

Health advocate and wellness researcher, Dr. Monroe brings clarity to confusing health trends with science-backed advice. Her mission is to help readers live vibrantly, from the inside out.